
- Check this post for a breakdown of the time I spent studying for the exam.
- Check this post for my overall experience on the exam and what I learned from it.
- Check this post for general tips and tricks for the exam and its preparation.
Introduction
The HTB CPTS exam has two main criteria that you need to meet within the ten-day testing period:
- Capture at least twelve out of the fourteen available flags.
- Produce a high-quality, commercial-grade penetration testing report.
If you’re anything like I was before the exam, you’re probably confident in your hacking skills but might not have much experience writing penetration testing reports.
A good way to prepare, as recommended by the course material, is to create mock reports for the AEN module, Pro Labs, and other CTF boxes. This practice can help you build the skills needed to write a strong report when the exam day arrives.
But honestly, I didn’t do any of that (besides some CTF writeups). The first real penetration testing report I ever wrote was the one I submitted for my exam. And based on the feedback I received, I think it turned out pretty well.
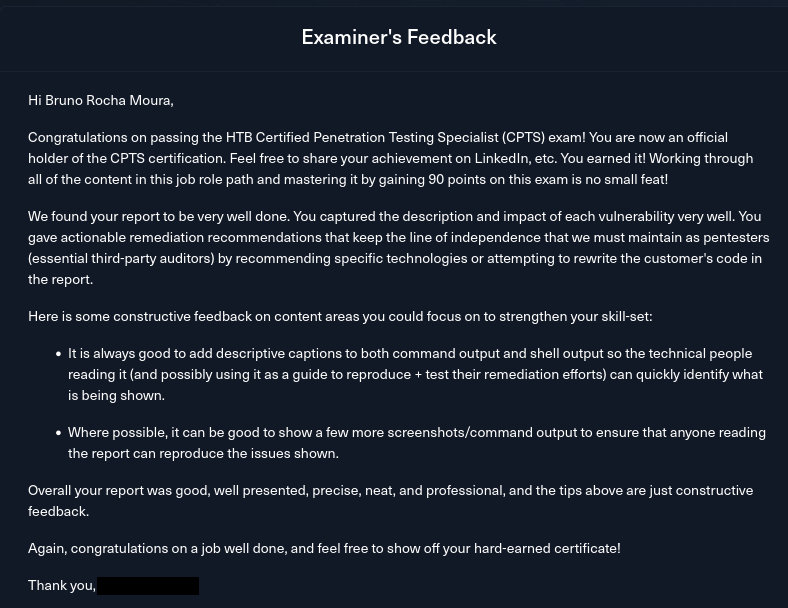
Examiner's feedback on my report.
I achieved this by developing what I call a trigger-based reporting methodology beforehand, which I followed during the exam to great success.
This methodology allowed me to fill up the report as I worked through the engagement. It kept the process smooth and balanced, so writing the report didn’t interrupt my hacking flow and vice-versa.
In this post, I’ll share the tools I used to write my report and the unique methodology that helped me succeed.
Note: Don’t take this post as a recommendation to skip reporting practice. If you feel the need to practice, definitely do it. I’m just sharing what worked for me.
Tools
Before diving into the reporting methodology, let’s quickly cover the tools I used to write my report.
While the methodology is the main focus, these tools were still crucial to my success.
SysReptor
When I started going through the course material, I was sure I’d just use a simple word processor like LibreOffice Writer to write my report. I didn’t want to deal with the overhead of specialized pentest reporting software, so I figured I’d just download a template from the internet and start typing.
But once I got to the Documentation & Reporting module, it was clear that wouldn’t cut it. Seeing the complexity and detail involved in a professional report, I realized I needed proper report writing software.
I decided to try SysReptor, a report writing tool designed specifically for penetration testers. It’s free, open-source, and self-hosted.

SysReptor banner.
This turned out to be an excellent decision, as it made the reporting process a lot easier than writing everything from scratch. SysReptor really delivers on its promise of making report writing painless.
In short, SysReptor works by letting you choose a report template that breaks the document down into sections, each with its own fields. You just edit the fields and add your findings to fill up the report. The heavy lifting of structuring and styling the report is already done for you.
When you’re finished, you can export the report as either a PDF document or an HTML page.

SysReptor usage example.
Even better, there’s an official HTB CPTS template for SysReptor, endorsed by Hack The Box itself! Check out the demo to see how a finished report might look.
You can check out this blog post by HTB on how to install SysReptor and add the CPTS template.
The methodology I developed relies on filling out SysReptor’s HTB CPTS template, so having it installed is a prerequisite.
ChatGPT
Another valuable resource for writing reports is ChatGPT or any other LLM chatbot of your choice.
You can enhance the quality and efficiency of your writing process by quickly drafting text without worrying too much about grammar or flow. The AI can then refine it by correcting any mistakes and adjusting the tone to match your needs.
Simply asking the bot to “Rephrase the text in a way that’s clear and professional” can transform your draft into a polished, professional report in no time, freeing you up to focus on hacking.
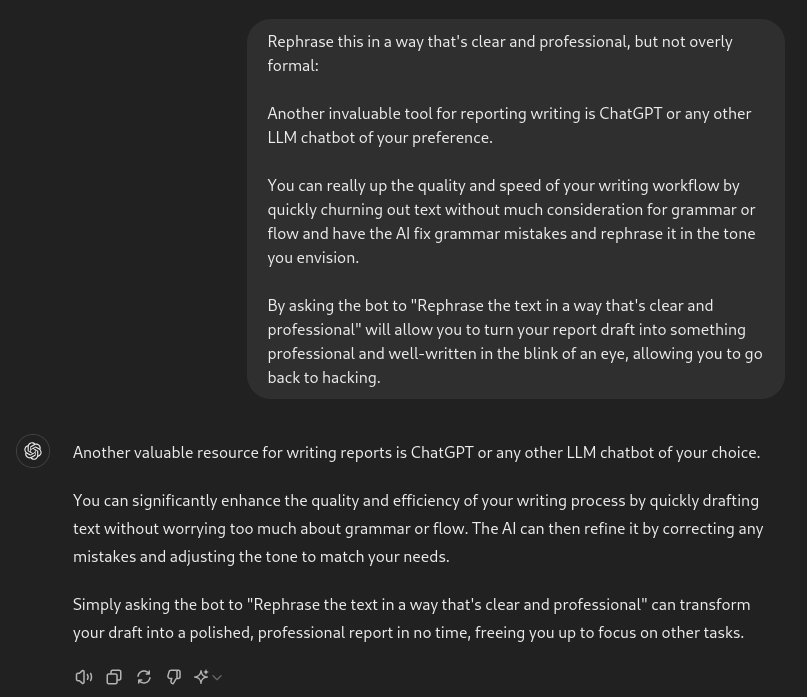
Me using ChatGPT on this very blog post.
However, it’s important to carefully review what the bot produces to ensure it aligns with your vision. Also, limit its use to rephrasing your own writing rather than generating content from scratch, as the AI can sometimes spew nonsense.
Methodology
Alright, let’s dive into the actual methodology and how it came to be.
A common piece of advice for this (and other) exams is to avoid leaving the reporting until the very end. Instead, you should work on it as you progress.
This is solid advice, but it doesn’t really address a crucial question: when should you take a break from hacking to update your report?
If you update your report too frequently, it disrupts your hacking flow and slows your progress. But if you take too few breaks, you’ll have too much to report at once, which can hurt the quality of your reporting. The key is to find a balance that’s predictable and manageable.
This is where my methodology comes in. As I mentioned earlier, we’ll be using the SysReptor HTB CPTS template, which handles the structure of the report for us. Now, we just need a clear strategy for when and how to fill it in.
What I developed is a trigger-based approach, where I map the different fields in the report to specific milestones during the engagement.
Whenever I hit a milestone, it triggers me to work on certain parts of the report. By establishing this beforehand, I always know when to take a break from hacking and exactly which sections of the report to focus on at that time.
Following this methodology has several benefits:
- Clear and easy to follow with an if-then approach.
- Removes guesswork on when to pause hacking for work on reporting.
- Breaks down reporting into small sessions related to what you just worked on.
- Reports are detailed because you write while things are fresh in your mind.
- No need to worry about styling or structuring the report thanks to SysReptor.
- Your report will be over 90% complete by the time you finish capturing flags.
Let’s get into it.
Reporting Structure
Before diving into the triggers I personally used and recommend, let’s first look at the structure of the HTB CPTS SysReptor template.
Here are the sections and their respective fields:
- Meta
- Candidate name, title and email
- Engagement Information
- Document Control
- Customer Contacts
- Executive Summary
- Executive Summary
- Approach
- Scope
- Assessment Overview and Recommendations
- Network Penetration Testing Assessment Summary
- Network Summary
- Summary of Findings
- Internal Network Compromise Walkthrough
- Walkthrough Summary
- Detailed Walkthrough
- Remediation Summary
- Remediation Summary
- Short Term
- Medium Term
- Long Term
- Appendix
- Finding Severities
- Host & Service Discovery
- Subdomain Discovery
- Exploited Hosts
- Compromised Users
- Changes/Host Cleanup
- Flags Discovered
- Domain Password Review
- Findings
- Title
- CWE
- CVSS
- Overview
- Impact
- Affected Components
- Recommendations
- References
- Details
Most fields already have default texts. These may be placeholders that you’ll need to fill in or stock text that’s pretty acceptable.
Not all fields need to be drastically changed, as some already have text that works well for most reports. Those are the bullet points not highleted in bold. You can leave them mostly as is (but make sure to read them) or rephrase them with your own words.
The fields in bold are the ones where you will definetely need to swap out the default text for your own.
Triggers
Finally, let’s go over the triggers I used during the exam.
We’ll associate milestones that will naturally occur during the engagement with specific fields in the report. When you hit an event trigger, stop what you are doing and fill in the appropriate fields.
The idea is that by filling out the report as these milestones occur, you’ll have most of the report done by the time the engagement wraps up.
These are the triggers I used, but you can create your own based on what works best for you. Make sure to write them down and refer to them regularly during the exam. If you’d like, use the table of contents of this blog post open for periodic reference.
When The Exam Starts
These are the fields you should fill as soon as you start the exam and receive the information about the security assessment you’ll perform:
- Meta
- Candidate name, title and email
- Engagement Information
- Document Control
- Customer Contacts
- Network Penetration Testing Assessment Summary
- Network Summary
- Summary of Findings
- Executive Summary
- Executive Summary
- Approach
- Scope
Basically, fill out the Meta, Document Control, and Network Penetration Testing Assessment Summary sections completely and most of the Executive Summary, leaving the Assessment Overview and Recommendations field for later.
Most these fields are fairly standard and require little to no modifications. Read them carefully and decide for yourself if you need to change something or leave as is.
When A Host Or Service Is Discovered
Once you discover a live host and enumerate the available services (e.g., via an Nmap scan), you should fill in the appropriate appendix:
- Appendix
- Host & Service Discovery
In this field, I slightly deviated from the default text provided by the template and created a table for each discovered host with its available services.
For each discovered host, create a table with the following columns:
| Column | Explanation |
|---|---|
| Port | The port(s) where the discovered service is running. E.g., “80” |
| Service | The name and version of the service. E.g., “nginx 1.18.0” |
| Notes | Any additional notes you have. E.g., “Hosts a custom support web application.” |
Ensure that each table is clearly labeled with a heading that identifies which host the information pertains to.
When A Virtual Host Or Subdomain Is Discovered
You should fill in the appropriate appendix with both the domains provided in the scope of the engagement (if any) and those you discover during your penetration test:
- Appendix
- Subdomain Discovery
This field consists of a single table with the following columns:
| Column | Explanation |
|---|---|
| URL | The URL of the domain. E.g., “admin.target.htb” |
| Description | A description of what the domain is used for. E.g., “Administrator dashboard for the web application.” |
| Discovery Method | How you discovered it. E.g., “Revealed in HTML comment.” |
When A Security Finding Is Discovered
This is one of the most important and time-consuming triggers, so it’s crucial to handle it correctly.
For each security finding, you need to add a Finding to the report.
Fill out all the fields:
- Findings
- Title
- CWE
- CVSS
- Overview
- Impact
- Affected Components
- Recommendations
- Details
- Remediation Summary
- Short Term
- Medium Term
- Long Term
Remember, each security finding should be documented individually. Don’t group multiple vulnerabilities, like SQL Injection, into a single finding.
Let’s break down the fields you’ll need to complete:
For the Title, while it can be challenging to come up with, there’s no strict standard you need to follow. As long as your title is clear and consistent, you can name the findings as you see fit.
Here are some example titles based on those I compiled from Hack The Box sources that might inspire you:
Insecure File Shares
Sensitive Data on File Shares
Unnecessary Exposed Services
Insecure Direct Object Reference (IDOR)
HTTP Verb Tampering
Unrestricted File Upload
Local File Inclusion (LFI)
Weak <APPLICATION> Admin Credentials
SQL Injection
Cross-Site Scripting (XSS)
SSRF to Local File Read
XML External Entity (XXE) Injection
Command Injection
Excessive Active Directory Group Privileges
Passwords in AD User Description Field
Misconfigured <APPLICATION> Instance
For the CWE, if you’re unsure, you can ask ChatGPT which CWE fits the vulnerability. Then, validate it by Googling <CWE> MITRE and reviewing the description.
For CVSS, use the CVSS calculator built into SysReptor or find one online. If you need assistance, ChatGPT can help, but make sure to verify the result yourself.
In the Overview field, provide a high-level explanation of the vulnerability both generally and in the context of your finding. Avoid covering the impact or remediation here, as those will be addressed in later fields.
In the Impact section, describe the security implications of the vulnerability if it remains in the client’s environment. Provide specific examples relevant to this instance of the vulnerability. You can present this information as a paragraph or a bullet-point list, but keep the format consistent across all findings.
In the Affected Components field, provide the smallest label that encompasses all the components affected by the vulnerability.
For example:
- If a vulnerability affects a single host or service, use a label that includes both the host and the service if relevant, like “
HOST01(SMB / 139,445 TCP)”. (e.g. EternalBlue) - If it affects a specific subdomain, use a label such as
app.target.htb. (e.g. SQLi on a web application) - For vulnerabilities affecting an entire subnetwork or an Active Directory environment, don’t list each host individually. Instead, use a label like “target.htb Active Directory domain” or an IP range, such as
10.0.0.0/8. (e.g. Kerberoasting)
In the Recommendations field, provide actionable steps to address the vulnerability. Never attempt to fix the issue yourself, such as by providing a “fixed” version of code. Instead, guide the client on how to resolve the issue. Each vulnerability covered in the course has an Academy section with mitigation suggestions that you can use as reference when writing recommendations. You can present these actions as a bullet-point list.
In the References field, include links to resources related to the security finding. Useful references might include:
- The NIST page for the CVE if applicable, and any relevant blog posts by the researcher.
- The MITRE page for the CWE, if available.
- An OWASP Prevention Cheatsheet for the vulnerability, if there is one.
- If you used a Proof of Concept (PoC) script you haven’t wrote yourself, provide a link.
Lastly, in the Details field, provide a step-by-step procedure to reproduce the discovery and exploitation of the finding, including explanations for each step. Be sure to include:
- Plenty of images and code blocks to illustrate your points.
- Label all images and code blocks clearly.
- Highlight important lines in code blocks.
- Crop images to show only the relevant portions.
- Redact any sensitive information from both images and code blocks.
- Mention tools and scripts used.
With the finding section complete, take a moment to fill in the fields related to the Remediation Summary section by adding recommendations for addressing this specific finding.
In this step, you can generally copy-paste the remediation actions you suggested in the finding’s Recommendation field and distribute them across Short Term, Medium Term, and Long Term fields as appropriate.
By the end of the engagement, you should have a bullet point list of short, medium, and long-term remediation actions for all the security findings you discovered.
When You Get Foothold On A Host
Once you gain command execution on a host, it’s time to add it as exploited to the appropriate appendix.
You’ll also document the steps for this initial compromise in the compromise walkthrough.
- Internal Network Compromise Walkthrough
- Walkthrough Summary
- Detailed Walkthrough
- Appendix
- Exploited Hosts
For the Exploited Hosts appendix, fill in a table with the following columns for each host:
| Column | Explanation |
|---|---|
| Host | The hostname and IP address of the host. E.g., “HOST01 (192.158.1.38)” |
| Scope | Indicate either “External” or “Internal,” depending on whether the host is external-facing or internal (e.g., in a DMZ). |
| Method | Describe the exploitation method used to compromise the host. E.g., “Command injection on web application.” |
| Notes | Include any additional notes about the host. E.g., “Domain Controller for target.htb.” |
For the compromise walkthrough, start by reviewing the Walkthrough Summary field. Make any necessary adjustments and see if it looks good to you. Feel free to rephrase it in your own words if needed, but otherwise you can leave it as is.
For the Detailed Walkthrough, you’ll document the steps related to the host you just exploited.
Use the following structure, which is divided into two parts:
{{ report.candidate.a_name }} ("the tester" herein) performed the following to fully compromise the <DOMAIN> domain.

<Here, include a numbered bullet point list where each point outlines a step in the attack chain.>

**Detailed reproduction steps for this attack chain are as follows:**

<Here, provide detailed steps in a writeup format.>
For both parts, exclude any findings unrelated to the shortest attack path to domain compromise. Write in the third person, referring to yourself as “the tester.”
-
Bullet Point List: Keep it concise and focused. It’s fine to have multiple points for a single finding, but don’t overdo it. Don’t include images, code blocks, or any extraneous details.
-
Detailed Walkthrough: Describe the steps thoroughly in a writeup format. Be highly descriptive and explain each technique or action in detail, at least once. Include plenty of images and code blocks—when in doubt, err on the side of including too many rather than too few. Add pertinent comments where appropriate, such as acknowledging effective security measures.
As you compromise more hosts during the engagement, this field will gradually fill up, resulting in a complete walkthrough of the attack chain by the end.
When You Root A Host
Once you’ve gained the highest local privilege on a host (root or SYSTEM), fill out the following fields:
- Internal Network Compromise Walkthrough
- Detailed Walkthrough
- Appendix
- Changes/Host Cleanup
First, take a moment to recall all the changes you made to the host since gaining a foothold. This could include actions like adding a web shell, transferring an executable, creating a local user, etc.
Even if you reverted a change, such as deleting a PoC script after using it, it’s important to document it in the report. The transfer might have triggered an EDR alert, and the client will need to know whether it was part of the pentest or a potential breach.
After compiling your list, add a table to the Changes/Host Cleanup appendix with the following columns:
| Column | Explanation |
|---|---|
| Host | The hostname and IP address of the host. E.g., “HOST01 (192.158.1.38)” |
| Scope | Indicate either “External” or “Internal,” depending on whether the host is external-facing or internal (e.g., in a DMZ). |
| Change/Cleanup Needed | A description of the change made. If it involves creating or transferring a file, include the MD5 sum. E.g., “Uploaded a web shell to /var/www/html/shell.php. MD5: 6ea3393fd7a4544d2fda0e42d7634013” |
Make sure to add a heading before the table to identify which host the changes relate to.
After documenting the changes, include the steps for this compromise in the Detailed Walkthrough field, both in the bullet point list and the detailed writeup.
Refer to the “When You Get Foothold On A Host” trigger for guidance on structuring this field.
When You Compromise A User
Once you gain control of a user, whether by obtaining their passwords, NTLM hash or however else, add this information to the appropriate appendix.
- Appendix
- Compromised Users
I recommend creating one table for local users and another for each Active Directory domain where you’ve compromised a user. Alternatively, you could create a separate table for local users on each individual host if that works better for you.
The tables should include the following columns:
| Column | Explanation |
|---|---|
| Username | The username for the user. E.g., “www-data” |
| Method | The method you used to gain control over this user. E.g., “Kerberoasted” |
| Notes | Notes about the user. For local users, specify the host they belong to. If the user has a specific purpose, mention that too. E.g., “HOST01’s local user for Tomcat service.” |
As always, ensure that tables are preceded by a heading identifying the host or domain they are associated with.
When You Capture A Flag
You captured a flag—great job! Now, add it to the appropriate appendix:
- Appendix
- Flags Discovered
I recommend using a single table with the following columns:
| Column | Explanation |
|---|---|
| Flag # | The flag number. Sort the rows in ascending order. E.g., “9.” |
| Host | The hostname of the host where the flag was found. E.g., “HOST01” |
| Flag Value | The exact value of the flag as found. |
| Flag Location | Where the flag was found. If it was in a file, provide the full path. E.g., “/root/flag.txt” |
| Method Used | The method used to exploit your way to the flag. E.g., “Privilege escalation via sudo rights over the wget binary.” |
When The Engagement Is Done
By the end of your engagement, if you followed the trigger methodology, your report should be over 90% complete. All that’s left is to finish the remaining fields and add some final polish.
The fields that need to be filled or revisited are:
- Executive Summary
- Assessment Overview and Recommendations
- Remediation Summary
- Short Term
- Medium Term
- Long Term
- Appendix
- Domain Password Review
Now that you have a complete walkthrough of the attack path in the Detailed Walkthrough field, it’s time to fill in the Assessment Overview and Recommendations section of the Executive Summary.
For this section, you’ll provide a plain-English summary of the attack path and your overall takeaways from the engagement. Avoid technical jargon, bullet points, and code blocks, as this part is intended for a non-technical audience.
Start with a paragraph on your overall assessment of their security posture. Reflect on the security findings and what they reveal about the client’s security practices. For instance, if no password spray attack succeeded, praise their strong password policy.
Then, write a paragraph for each security finding in the attack chain. Explain each vulnerability in simple terms that anyone can understand (without sounding patronizing) and include straightforward remediation suggestions.
The default text for this field is well-written, so definetely keep it and insert your own text where indicated.
After that, revisit the Short Term, Medium Term, and Long Term remediation fields. By now, you should have remediation actions related to the specific security findings listed. However, it’s also important to add recommendations that address the overall security posture of the organization.
For example, if many findings were related to outdated software with known CVEs, you should recommend reviewing and improving their software update procedures. Additionally, offer broad advice such as conducting regular security audits and staying up to date with best practices.
An appendix not included in the SysReptor template but recommended by the course material is Domain Password Review.
In this appendix, you’ll provide statistics on the passwords of Active Directory domain users after achieving domain compromise and dumping NTDS.dit. Key statistics to include are:
- Number of hashes obtained
- Number of unique hashes
- Percentage of hashes cracked
- Most commonly used passwords
- Password length breakdown
To generate these statistics, I recommend using the DPAT Python script. Take the most insightful statistics it provides and create tables for them in the appendix.
Lastly, review your entire report thoroughly and add any final polish as needed. Proofread it multiple times. If you have the time, take a break once you think the report is done, sleep on it and then read it again the next morning with fresh eyes.
And there you have it, a complete report! Submit it and you’re done.
Conclusion
Most penetration testers love diving into the technical side of hacking but dread writing the report afterward. If you’re into the techy parts of penetration testing, writing reports for C-level executives and other business types probably isn’t your idea of fun.
But remember, the report at the end of an engagement, along with other deliverables, is what the client is actually paying us for. It’s not just an annoying formality, it’s the main reason our client hired us in the first place.
I hope this post helps you write a great report for your HTB CPTS exam attempt.